Eight Multi Split System VRF VRV System Installation Steps
DATE:2020-07-08
Read:
SHARE:
Eight Multi Split System/VRF VRV System Installation Steps
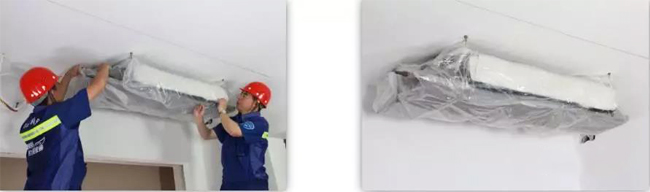
1. IDU(Indoor Unit)
The first step for the instruction team is mounting indoor unit, and here just pay attention to two points which could avoid the subsequent problems.
A: The distance between the IDU and the ceiling should not be less than 1cm to avoid resonance with the ceiling when the ac is running.
B: The IDU must be mounted in a horizontal position. After installation, you need to use a special tool to measure whether the IDU is level.
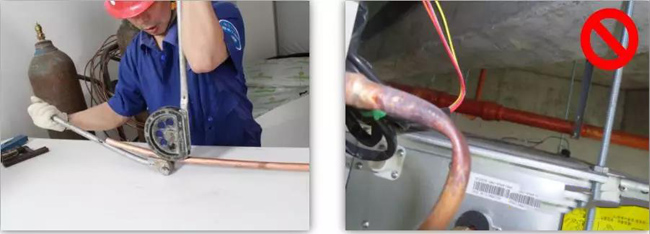
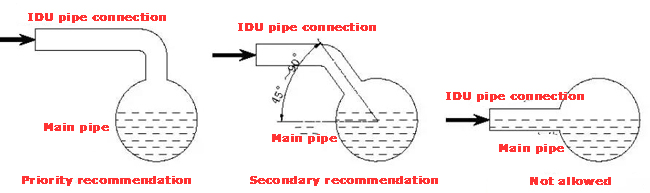
2.Copper Pipe Connection
This is the most important step in central air conditioner installation!
A. All the welding points should be the joints between the copper pipe and the branch, and there is no welding between the copper pipe and the copper pipe.
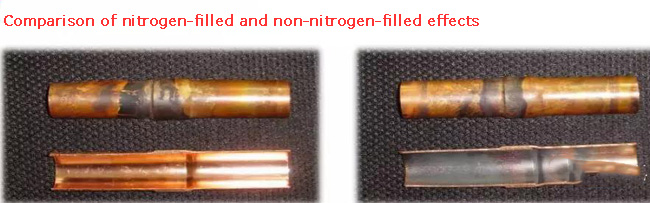
B. Nitrogen must be flushed into the copper tube during the welding process (nitrogen-filled welding process), which makes the copper tube free of air to avoid welding and carbonization of the inner wall to enter the compressor during normal operation and cause failure.
C. After welding, high-pressure nitrogen should be used for sootblowing in the pipe to keep the copper pipe clean.
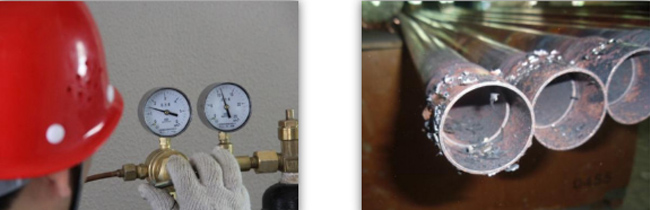
3. Nitrogen filling pressure keeping
This is a pressure test that must be carried out on the copper pipe after welding is completed. Fill the copper pipe with nitrogen at a certain pressure to maintain the pressure. The general pressure test time is 24 hours.
Special Note:
For R410a refrigerant, the pressure in the copper tube must be maintained at 40kg, and for R22 refrigerant, the pressure should be 20kg. Nitrogen is an inert gas with a small expansion coefficient, and there is almost no pressure change due to thermal expansion and contraction. If the pressure gauge drops during the test, you should check the refrigerant tube welding for problems.
4. Condensate Pipes Installation
After the condensate pipe is connected from the internal unit to the outdoor or floor drain, maintain a slope of at least 1%. Better installation is to connect from the indoor unit and fall to the nearest ground, and finally it will be connected to the outdoor or floor drain together with other condensate pipes.
5. ODU(Outdoor Unit) Installation
Make sure that the air outlet of the fan of the ODU must be within 50cm of the inside and outside of the 15cm of the rear of the ODU, and all landing feet must be equipped with shock-absorbing blocks to ensure the normal operation of the external machine.
6.Vacuum
After the ODU is installed, the refrigerant tube needs to be evacuated before the refrigerant is filled. The air in the tube is evacuated to keep the tube dry and free of moisture. Otherwise, the air and water will mix with the refrigerant to produce ice crystals, which will seriously damage the equipment.
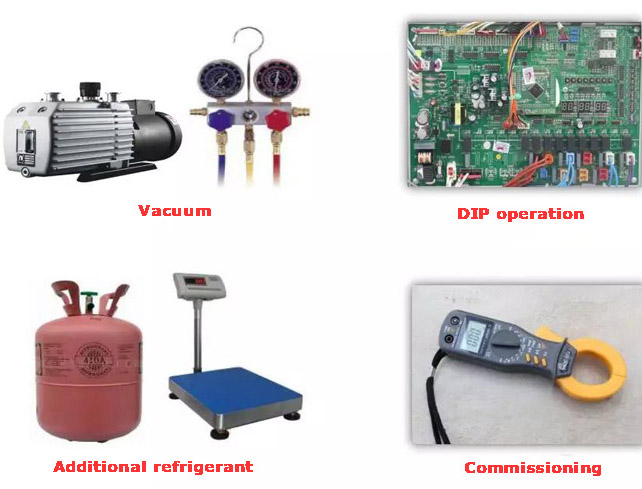
7. Fill Refrigerant
After the above work is completed, you can open the refrigerant valve to release the refrigerant that comes with the ODU. Then start the test and detect the pressure, and make appropriate supplements until the commissioning is completed and the ideal working state is reached.
8. Vent Installation
Return air vent: Usually the return air vent should be installed near the maintenance. The size of the air vent must be consistent with the return air vent of the IDU.
Air outlet: If using ABS air outlet, there must be a certain space for thermal expansion and contraction when measuring the air outlet. And please note that the air outlet must not be installed near the light belt (Reason: if there is a light belt in front of the air outlet, it will cause the air conditioner blocking the wind during heating, and the hot air is upward, causing the hot air to stay in the room upper part, so that the entire activity space feels insufficient heat, it takes a long time to feel the heat.)
Back
1. IDU(Indoor Unit)
The first step for the instruction team is mounting indoor unit, and here just pay attention to two points which could avoid the subsequent problems.
A: The distance between the IDU and the ceiling should not be less than 1cm to avoid resonance with the ceiling when the ac is running.
B: The IDU must be mounted in a horizontal position. After installation, you need to use a special tool to measure whether the IDU is level.
2.Copper Pipe Connection
This is the most important step in central air conditioner installation!
A. All the welding points should be the joints between the copper pipe and the branch, and there is no welding between the copper pipe and the copper pipe.
B. Nitrogen must be flushed into the copper tube during the welding process (nitrogen-filled welding process), which makes the copper tube free of air to avoid welding and carbonization of the inner wall to enter the compressor during normal operation and cause failure.
C. After welding, high-pressure nitrogen should be used for sootblowing in the pipe to keep the copper pipe clean.
3. Nitrogen filling pressure keeping
This is a pressure test that must be carried out on the copper pipe after welding is completed. Fill the copper pipe with nitrogen at a certain pressure to maintain the pressure. The general pressure test time is 24 hours.
Special Note:
For R410a refrigerant, the pressure in the copper tube must be maintained at 40kg, and for R22 refrigerant, the pressure should be 20kg. Nitrogen is an inert gas with a small expansion coefficient, and there is almost no pressure change due to thermal expansion and contraction. If the pressure gauge drops during the test, you should check the refrigerant tube welding for problems.
4. Condensate Pipes Installation
After the condensate pipe is connected from the internal unit to the outdoor or floor drain, maintain a slope of at least 1%. Better installation is to connect from the indoor unit and fall to the nearest ground, and finally it will be connected to the outdoor or floor drain together with other condensate pipes.
5. ODU(Outdoor Unit) Installation
Make sure that the air outlet of the fan of the ODU must be within 50cm of the inside and outside of the 15cm of the rear of the ODU, and all landing feet must be equipped with shock-absorbing blocks to ensure the normal operation of the external machine.
6.Vacuum
After the ODU is installed, the refrigerant tube needs to be evacuated before the refrigerant is filled. The air in the tube is evacuated to keep the tube dry and free of moisture. Otherwise, the air and water will mix with the refrigerant to produce ice crystals, which will seriously damage the equipment.
7. Fill Refrigerant
After the above work is completed, you can open the refrigerant valve to release the refrigerant that comes with the ODU. Then start the test and detect the pressure, and make appropriate supplements until the commissioning is completed and the ideal working state is reached.
8. Vent Installation
Return air vent: Usually the return air vent should be installed near the maintenance. The size of the air vent must be consistent with the return air vent of the IDU.
Air outlet: If using ABS air outlet, there must be a certain space for thermal expansion and contraction when measuring the air outlet. And please note that the air outlet must not be installed near the light belt (Reason: if there is a light belt in front of the air outlet, it will cause the air conditioner blocking the wind during heating, and the hot air is upward, causing the hot air to stay in the room upper part, so that the entire activity space feels insufficient heat, it takes a long time to feel the heat.)